Backing Up Plakar Control Plane
Plakar Control Plane can back up its own configuration and database using the same backup workflow you use for any other resource. The process follows the standard steps: create an inventory, register the resource, attach a source app, and schedule a backup task.
Create a self-managed inventory
If you do not already have a self-managed inventory to hold the Plakar Control Plane resource, create one now. See Self-Managed Inventory for instructions.
Register the Plakar Control Plane resource
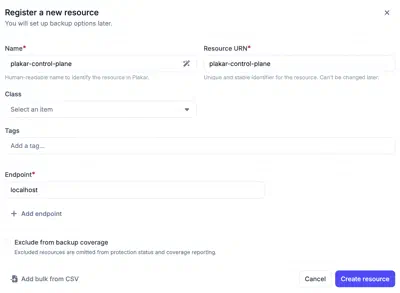
Inside your self-managed inventory, add a new resource manually with the following values:
| Field | Value |
|---|---|
| Name | Plakar Control Plane (or any name you prefer) |
| URN | plakar-control-plane (or any unique identifier) |
| Hostname | localhost |
Add a source app using the PCP integration
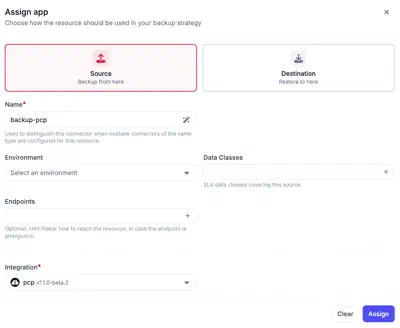
Once the resource is created, open it and go to the Apps tab. Add a Source app and select the PCP integration (PCP stands for Plakar Control Plane).
Schedule a backup task
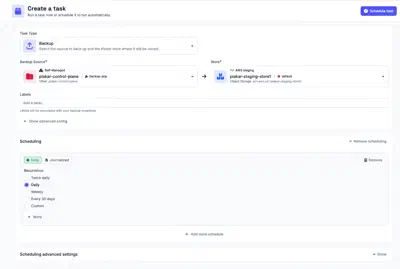
With the source app in place, create a backup task to run it on a schedule. You can do this from the app’s dashboard or from Operations > Scheduling.
Select your PCP source app as the source and choose a store app as the destination. Configure a schedule that fits your recovery point objective.
See Scheduling for full details on creating tasks.
What the backup contains
Once a backup task completes, you can browse the snapshot contents like any other backup. A Plakar Control Plane snapshot includes:
- Important configuration files
- A database dump of the Plakar Control Plane internal database
If you need to recover from this snapshot, see Restoring Plakar Control Plane.